Creating Scars: Difference between revisions
bonfire-wiki>Attrembl No edit summary |
bonfire-wiki>Attrembl |
||
| Line 58: | Line 58: | ||
Atrophic white.png|The same scar layer with the white background, ready to export. | Atrophic white.png|The same scar layer with the white background, ready to export. | ||
Atrophic tint.png|Another copy of the scar layer, created before the layer was blurred, colored red and set to 33% opacity so it can be used to tint the final scar. | Atrophic tint.png|Another copy of the scar layer, created before the layer was blurred, colored red and set to 33% opacity so it can be used to tint the final scar. | ||
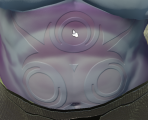
atrophic applied.png|The | atrophic applied.png|The atropic scar applied to an orc in Bonfire. The scar alone does not show much definition. | ||
Atrophic applied with 33% red tint.png|A 33% red tint tattoo applied over the scar to make it more prominent. A dark tint may also be applied if you wish to make the scar look less fresh. If you want it to look really fresh, you can google for images of freshly cut scars to figure out how to fill the tint. But I wouldn't recommend that. | Atrophic applied with 33% red tint.png|A 33% red tint tattoo applied over the scar to make it more prominent. A dark tint may also be applied if you wish to make the scar look less fresh. If you want it to look really fresh, you can google for images of freshly cut scars to figure out how to fill the tint. But I wouldn't recommend that. | ||
</gallery> | </gallery> | ||
[[Category:Character Mods]] | [[Category:Character Mods]] | ||
Revision as of 03:06, 13 November 2020

Scars, like tattoos, are image files overlaid on your orc character. They don't apply color to your orc's skin, though. They create texture on your orc's skin.

Getting Started
Familiarize yourself with Creating Tattoos. The tools you use to create scars are the same. The techniques you use to apply scars are the same. But scars are much more subtle, and you have a much more restricted tool set in creating them. Depending on the scars you're designing, you may want to combine them with translucent tattoos to "tint" the scars and give them a more naturalistic appearance.
Scar inspirations
Scars on the human body take two forms: raised (hypertrophic and keloid) scars and sunken (atrophic) scars. There is no reason to not expect orcs to scar in the same way.
Hypertrophic scars take the form of "bumps" on the surface of the skin. Their edges and texture are quite rounded because they're caused by an over-production of collagen while the wound is healing. The ritual scars on Eric Killmonger in Black Panther are hypertrophic scars.
.jpg)
Atrophic scars take the form of "valleys" on the surface of the skin. They can have distinct and more sharp-looking edges than hypertrophic scars.
Both atrophic and hypertrophic scars can form naturally, or can be intentionally encouraged by a number of techniques.
Figure out what story you're telling. Does your character come from a clan where ritual scarring is practiced? Does he have majestic battle scars? That's going to guide your design process.
Creating your scar
Tattoo files can have any color you can paint. Scar files are grayscale. Black is deepest. White is highest. The grays in between can create different heights in between.
To create sunken atrophic scars, you're going to want to start with a white background and create your scar image on it in black.
To create raised hypertrophic scars, you're going to want to start with a black background and create your scar image on it in white.
That sounds simple until the background covers up your TatGuide template layer.
To avoid this problem, you need to create your scar in (at least) 2 layers. Create a "Scar Background" layer on top of your TatGuide layout layer. Fill it with your background white or black. Then hide it or make it translucent so you can see the layout template.
If you're creating raised scars, you may want to also create a throw-away "helper" layer with a translucent red or blue background. That can make it easier to see the white scars you're laying out on the template. White on gray isn't always that easy to see.
It is possible to mix raised and sunken scars in one design. You can always start with a gray background and just be satisfied with only having half the depth/height for each type. If you want more texture and definition, you'll have to create a background with black and white sections under the different types of scars, and a gentle gradient connecting the areas.
Giving your scar natural edges
Scars rarely have purely vertical edges.
After you've finished your layout, hide your layout template layer (and helper layer if you used one) and show your background layer. You should be able to see a pretty stark black and white scar image. Using the blur tools on your scar image layer can soften the edges a little. Photoshop's "Gaussian Blur" tool gives you very precise control over how much blur you're adding.
Atrophic scars may just need a pixel or two of blur one time to create an edge that's not too sharp.
To create the "rounded" bumpy look of hypertrophic scars, repeat a small blur over and over to blur the edges of your scar more without blurring the center.
Samples
This is going to be a less-detailed how-to than the how-to in Creating Tattoos. It's really just a gallery of sample images. Background layers are given meaningful layer names, but the actual scar design layers are not.
Scars are applied using the scar command in the console. It works the same way the tattoo command works in the console.
Hypertropic scar samples
This hypertropic scar is a simple design that lends itself to the rounded shape real hypertropic scars take on.
-
 A simple swirl, laid out over a translucent blue helper layer. The swirl has had a 1 pixel gaussian blur applied 3 times to "shape" the texture to reproduce the appearance of a keloid scar.
 -
 The same image, now with a black background laid under it, ready to export.
 -
 The Keloid scar applied to an orc in Bonfire. Note the smooth "hump" created by the repeated blurring.


Atropic scar samples
This atropic scar design is a large, deep scar. It is most prominent and clear when a red tint layer is applied in the scarred area.
-
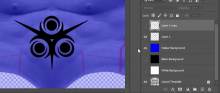 A larger pattern, laid out over a translucent blue helper layer. The pattern has had a 1 pixel gaussian blur applied to soften the edges of the scar.
 -
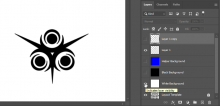 The same scar layer with the white background, ready to export.
 -
 Another copy of the scar layer, created before the layer was blurred, colored red and set to 33% opacity so it can be used to tint the final scar.
 -
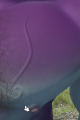
 The atropic scar applied to an orc in Bonfire. The scar alone does not show much definition.
 -
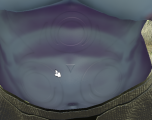
 A 33% red tint tattoo applied over the scar to make it more prominent. A dark tint may also be applied if you wish to make the scar look less fresh. If you want it to look really fresh, you can google for images of freshly cut scars to figure out how to fill the tint. But I wouldn't recommend that.


.jpg)
.jpg)
.jpg)